I think its fair to say that my partner is as passionate about knitting as I am about bikes. Living with a knitter means that I'm never short of a jumper or two,
living with a bike addict means that my partner is forever bored to
death with endless conversations about small bits of bicycle. The other day when talking about a couple of bikes that had come in with nasty saddles we got to talking about what the possibilites might be. Up until that point damaged seats were removed and stored in a dark corner of the workshop...until some remedy could be found for their decrepid state. She disappeared and returned a couple of hours later with this solution...
A fabulous knitted seat cover!
...and in her other hand was this, a bike sock to protect the frame from nasty boots and heavy locks....thanks chicken!
Showing posts with label saddle. Show all posts
Showing posts with label saddle. Show all posts
Wednesday, 15 August 2012
Sunday, 5 August 2012
Recycled saddlebag
Sometimes its nice to get away on the bike with no more than a puncture kit and a drink. I used to have a lovely leather brooks tool bag that sat under my seat for exactly this purpose, but age got the better of it and after making a few repairs to the straps i've decided to retire it. Sitting there instead now is my tetrapack saddle bag- made from a recycled milk carton, its cheap, easy to make and less likely to be stolen. Here's how to make your own...
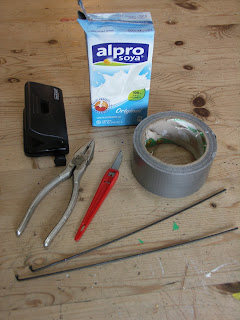
Your going to need, an old drinks container, a couple of old spokes, some gaffa/ duct tape, a pair of pliers, a holepunch and a sharp knife/ scalpel.
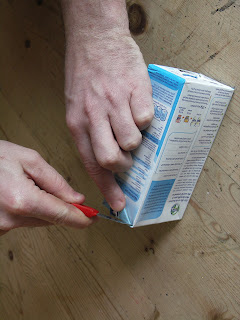
using the scalpel, cut into the side of the carton across the two shorter edges and ONE of the longer edges
This should leave you with a flap which (hopefully) will still be attached to the carton, if its not- find another carton and start again!
Next up you'll need to make yourself some buckles, take your pliers and your spoke and bend it into a buckle
Buckle making takes a little practice but is really easy to do, they should look like this (look left) when they're done
Your buckles should be the same width as the straps you're going to make. Using a length of duct tape attach your buckle to one end. I never realised how difficult it was to cut a length of duct tape- after several aborted attempts I ended up asking for help to hold one end.
With the buckle attached and at the top, begin to wrap the length of duct tape around the back of your carton- at the front trim the tape to meet the edge of your carton.
You will now have your buckle attached to the back of your carton. In order for the saddlebag to attach to the seat you'll need another length of duct tape which is attached in line with the first buckle on the underside of your flap. Stick this around the flap and onto the outside face until the second piece of tape has reached the buckle.
Fold over this length of duct tape so that you now have a strip of tape which is joined by its two sticky edges and forms a strip which will fit into the buckle
Your carton saddlebag should look something like this. You now have a saddlebag which is perfectly functional- you can hold the flap closed with a piece of string or innertube tied around the outside. I use a tag to hold mine closed- if you'd like to do the same read on...
To hold the flap down (to keep the weather out) you're going to need a leftover piece of spoke, a piece of inner tube, some pliers and some scissors....and some more duct tape!
Stick a piece of Duct tape onto the flap in the middle of your saddlebag
Make a hole in the new piece of tape on the flap. With the flap held closed mark on the main carton where the hole sits, reinforce with more duct tape and make a hole which should then line up with the hole on the flap.
From the piece of spoke cut off two short pieces from which you are going to make a treasury tag, using the piece of inner tube
It should look like this, either snip a small hole 1/3 of the way down each end of the inner tube and thread the bits of spoke through or simply snip the ends and tie a knot.
Here it is, finished and attached to the bike. Due to its un-environmentally friendly plasticied in/ outside, these cartons are remarkably weather resistant...as is the duct tape.
As with most things, its easy to make if you know how- if you get stuck making yours drop me a line and i'll try to help.
Subscribe to:
Posts (Atom)


